


The First Four Lessons (Guitar)
The following material is a look at the way that you might choose to incorporate some of the teachwombat.com materials into your business.
It looks at developing a (flexible) programme of lessons geared towards the complete novice (perhaps the single most common type of student faced by guitar teachers?).
It is important to realise that students vary quite considerably in terms of how quickly (or slowly) they are able to develop skills or take on board information. It is quite possible (even desirable!) that as a teacher you may feel that a particular student might benefit from being introduced to some of the material from the next session. It is equally likely (and indeed desirable) that you might spend more than one lesson dealing with a particular chord sequence or fingering exercise. Please bear this in mind and regard the following material as guidelines rather than a rigid structure.
Lesson 1
Get the guitar in tune. This used to be a real problem but the novices of today have it easy. Electronic guitar tuners are a must and will ensure that the student is able to play along effectively with the backing tracks.
Take time at the start to tell the student that to play any musical instrument (not just the guitar) properly involves a mastery of two different elements. These two elements are the “Theoretical” and the “Technical” aspects of musicianship
The first of those elements mentioned above (Music Theory) covers some of the following questions
-
Which notes do I play?
-
Which scale will fit over a particular chord sequence?
-
Which chords sound good together and why?
Explain that theory is very important to a musician and let them know that these sort of questions will be discussed during future lessons but that at the moment there is very little point in knowing which notes and chords you would like to play if you can’t physically play them!
For that reason tell them that the first lessons tend to be taken up with developing a physical capability on the instrument.
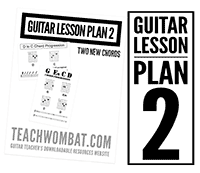
Give the student the handout featuring the G Em C D chord progression
Explain how the chord diagrams work and make sure that they know that the numbers inside the black dots refer to the fingers used to hold down the strings.
Ask them to refer to the handout, slowly form each chord in turn and strum it once in their own time.
Depending upon the individual this may take a little while.
During the lesson work toward a situation where the student can change between one chord and the next one
Ask them to play the chords first in the sequence presented on the handout (G Em C and D) and when they can do that mix the chords up a little (eg request that they play an Em chord followed by a D chord etc)
The idea is that the pupil develops an ability to remember the fingerings and play them without reference to the handout.
The handouts are great (I would say that I’m trying to sell them to you!) but it’s no good if the knowledge stays on the paper. Let the student know that what we are looking for is a situation where the chord names and the fingerings are available for instant recall.
When these changes are reasonably secure let the student hear the backing track “G Em C D” (downloadable now from our members area).
The track features drums and a bass player going around the chord sequence.
Now ask the student to strum a single chord as each change comes around. The idea behind this is that having played a single chord the novice player has time to get ready to fret the next one.
Some students will adapt to this fairly quickly whilst others will take a little time to get to grips with the fingerings involved.
Now might be a good time to talk about the following notion.
“You don’t learn to play guitar during guitar lessons-you learn to play between guitar lessons”
If an individual was able to play everything presented to them perfectly by the end of the lesson then it can be argued that the material was pitched way too low.
The object of a good lesson is to give the student a desirable (and achievable) outcome that they can work towards between sessions. If you explain this to them and have them understand it then they tend to feel a little less frustrated that they don’t play everything perfectly straight away.
For the students who pick up the changes early it is possible to introduce more involved strumming patterns. It is a good idea at this stage to be careful to restrict the strums to the early part of each chord so that the learner will continue to have time to move between the shapes.
Towards the end of the session give the student a copy of the backing track on CD for private study (this usually goes down very well!) and ask them if there is anything that they do not understand about the material studied.
Before the lesson ends give the student a copy of the handout “First Guitar Chords” and tell them that it may be worth looking at the sheet before the next session as the chords used in the next backing track (Am Dm E) are on it. You could even use a pencil to indicate which chords from the sheet are to be studied.
Lesson 2
Start the session by playing the backing track to the last session (G Em C and D) and observing the progress made by the student between lessons.
Make a judgement as to how much time you need to spend dealing with issues arising from the first lesson.
If students are basically sound with relation to the chord sequence and backing tracks some time could be spent at this point introducing some more complicated strumming patterns (featuring up strokes and/or missing out down strokes perhaps?)
When you are satisfied that sufficient progress has been made find out how far the student has progressed with relation to the three chords (Am Dm and E) identified as being the next ones under study on the “First Guitar Chords” handout given to them at the conclusion of the last session.
A common situation is one where chords “look right but sound wrong”.
Ask your student to play each of the notes individually rather than strumming a full chord. This will usually reveal that some of the fretting hand fingers are muting strings that they are not supposed to be touching.
Go through the same processes as during the last session with regard to the student being able to finger and strum the chords correctly before once again introducing the backing track featuring a repeated pattern made up of one bars each of Am and Dm followed by two bars of E (you can download the track free from the teachwombat members area immediately following purchase).
By now you should be getting a feel for how each individual student deals with the material presented to them and depending on progress you can use your judgement to introduce more advanced strumming patterns etc as you see fit. As a failsafe there is nothing wrong with having the student play a single chord at the start of each change. Anything North of that is a bonus!
There is another backing track available free from the member’s area which deals with the chords of D A and G (again the fingering for the new chord of A is on the “First Guitar Chords” handout). Depending on the student’s progress you could choose to send them away with two backing tracks on the same disc or you could introduce the D A G Chord sequence during a later session.
When you have made sure that the student understands what they need to do before the next session in order to make progress then send them away with a backing track and a handout to practice.
Lesson 3
After you have checked on the progress made on the material presented during the last session (always a must!) you could go on to explain that as well as strumming chords a guitarist needs to be able to control single notes.
To that end it is time to introduce the first of a series of fingering exercises designed to promote dexterity and co-ordination. It is perhaps wise to spend some time talking to the student about scales. You could tell them that a lot of people who want to play guitar would like to do so without learning about something as “dry and boring” as scales (if you think back you yourself may have been one of them?). They need to become convinced that scales are where music (and solos in particular?) comes from and that a decent working knowledge of a few basic scales will go a long way towards creating a good musician.
By the end of this session it is to be hoped that the student will be able to play a C major Scale and also be able to go away and work on playing some music that uses it.
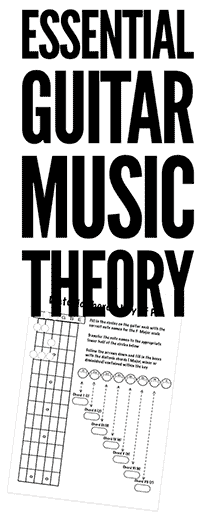
Give the student the handout which shows how to play the one octave C Major Scale using a combination of open strings and fretted notes.
Tell them that the C major chord shape that they can already play (from lesson 2 – the G Em C D chord sequence) is very closely related to the C Major Scale and that a good place to start from is to get the fingers in position as if they were going to play a chord of C
Work with the student until they can play the scale ascending and descending without having to refer to the printed sheet.
An effective way to get results with this kind of exercise is to ask the student to play the first note (C at the third fret of the A string).
After that ask them to play the first two notes one after another (adding the D string open). Then the first three notes (the first two with the addition of the note to be found at the second fret of the D string) and so on until the whole scale is learned.
The advantage of this method is that it avoids a situation where a student diligently works through the entire exercise from start to finish only to find that by the time they get to the end they forget everything that they did at the start!
By starting at the first note and adding one note at a time without knowing it a student will reinforce the knowledge that they have just gained as well as taking in new instructions.
After the scale has been mastered it is important to turn it into music as quickly as possible so that the pupil has some proof that you were not making it up when you said to them that “the music lives inside the scales”
I am normally very suspicious of guitar instruction books that use old and out of copyright (and therefore free to the publisher!) material when attempting to engage the interest of those poor souls who have laid out good money to buy their book. I have yet to meet a student who is turned on by the thought of learning to play “Frankie and Johnny” or who feels that they will be able to impress the heck out of (or let’s face it the clothes off of) people that they run into by stunning them with a twenty first century take on “Oh My Darling Clementine” or “Merrily We Roll Along”
This stuff is in books for one reason only. The publishers don’t have to pay anyone to use traditional (and therefore copyright free) material.
Having said all of the above at this stage we need a tune melody that satisfies both of the following criteria
1 It uses all of the notes of the C Major Scale at least once
2 Just about everyone knows it regardless of gender or age (which is more than you can say for “Frankie and Johnny!)
3 It is fun to play (which unless there is something very strange up with you is more than you can say for “Oh My Darling Clememtine”)
I use the bit that everyone remembers from “The Can Can” (you know the bit that goes “Can Can Kitty Kitty” etc)
It has all of the notes of the major scale in it and I can honestly say that since I started using it no-one (no matter what breed of wild eyed, reckless bad mutha they believe themselves to be) has expressed any reservations about learning to play it. I think that this is because of the energy and tempo of the tune. People seem to like the idea of playing something that goes quicker than the usual mid paced and pedestrian dreck that they are commonly confronted with in the early stages of playing.
The Can Can is easier to play than it sounds because of the heavy use of open strings (which lets face it unlike the F chord are pretty easy to fret!) and the repeated use of a single rhythm pattern (Can Can Kitty Kitty) until the last figure which is nothing more than a complete run down the C Major Scale.
Give the student a copy of the handout featuring the tune (available from the teachwombat.com members area)
Encourage them to learn the tune as they did the scale (one note at a time).
Depending upon the progress made during this session and the amount of time dedicated to learning the scale you may be in a situation where the student needs to work on their own in order to master the material presented to them. This is fine as you will recap the material at the start of the next session anyway.
When a pupil first encounters this kind of exercise it is quite common for all plectrum strokes to be downstrokes. I am quite happy with this until the student has mastered the tune with relation to the correct fretting hand fingering.
When the left (fretting) hand is secure in what it is supposed to be doing then that’s the time to turn “Can Can Kitty Kitty” into “Down Down Down-Up Down-Up”
This will probably be something for the next session but with a particularly able or dedicated student you may well have the chance to deal with the direction of plectrum strokes at this stage.
Anyway at whatever stage you leave the session remember to again stress the importance of practice and the notion that “you learn to play between lessons and not during them”
A student who has mastered the exercise slowly should be encouraged to spend practice time devoted to speeding the tune up and/or working on the correct use of down and up strokes with the plectrum.
Before the session ends remind students to continue practicing using the CD’s supplied as backing tracks and the chord sequences dealt with in earlier sessions
I suppose at this stage it’s worth mentioning that if you don’t always want to burn CD’s off for students you could always email the backing tracks to them as attachments.
Lesson 4
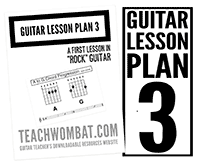
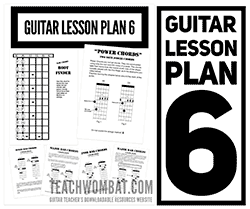
Soloing using the pentatonic minor scale
As Bryan Adams so succinctly put it “The Kids Wanna Rock” and the sooner your students become convinced that you are the person to get them doing it the more chance you have of creating a situation where they give you loads of repeat business.
With this in mind there is no reason why you could not substitute this lesson for the one dealing with the Can Can. They are pitched at about the same level and particularly with players who express a particular preference for all things rocktastic there is no reason why you shouldn’t deal with the stuff about the pentatonic minor scale before going on to cover the Major Scale stuff.
Start off by explaining that this scale is the place where Rock guitar lives.
Give them the handout dealing with the correct formula and fingering for the one octave pentatonic minor scale in the key of A (the one that uses the A note to be found on the 7th fret of the D string as it’s root).
It might be a good idea at this point to play a few licks of your own choosing drawn solely from the scale in this position so that students will have some idea what they are aiming for.
Encourage the pupil to learn the sequence of notes one at a time until they can ascend and descend the scale reasonably securely.
When they can play up and down the scale adequately you could ask them to learn the following sequence of notes or begin work on a few licks of your own choosing.
If you decide to have a crack at the sequence below play each one of the nine notes evenly in a constant quaver (one-and-two-and-three-and-four-and) rhythm.
If you are doing it right you should pretty quickly cotton on to the phrase which has been around for ever and is a particular favourite of Led Zep’s Jimmy Page. Anyway……….here goes!
(low) root D string 7th fret
b3rd G string 5th fret
4th G string 7th fret
(high) root E string 5th fret
b7th B string 8th fret
5th B string 5th fret
4th G string 7th fret
b3rd G string 5th fret
(low) root D string 7th fret
When they are reasonably secure with this ask them to do it again but this time to attempt to bend the third note that they play (at the 7th fret of the G string) up a full tone.
(low) root D string 7th fret
b3rd G string 5th fret
4th G string 7th fret (BEND NOTE UP A FULL TONE AS YOU PLUCK IT!)
(high) root E string 5th fret
b7th B string 8th fret
5th B string 5th fret
4th G string 7th fret
b3rd G string 5th fret
(low) root D string 7th fret
Something to watch out for at this stage is that students will often try to bend the note using just one finger (the third finger). They will find this difficult and most probably painful!
Let them know that it’s ok to have the second (and maybe even the first) finger of the left hand come in and support the bending finger.
Another common situation at this stage is that students can tend not to bend the string far enough. At this point you could let them hear what the note sounds like bent up a full tone until it becomes the next note in the scale (compare it with the fretted note to be found on the B string at the fifth fret)
When they become reasonably secure with the sequence of notes you could talk to the student about how solos are not generally composed of a stream of pure inspiration but rather are combinations of established patterns and licks.
You could demonstrate this by playing (first quickly and then more slowly so they can take it all in) some of your favourite licks and phrases.
One that can be very effective is to isolate the third-fourth fifth and sixth notes of the above sequence so that you start with the following…………
4th G string 7th fret (BEND NOTE UP A FULL TONE AS YOU PLUCK IT)
(high) root E string 5th fret
b7th B string 8th fret
5th B string 5th fret
Play the above sequence of four notes over and over again as many times as you feel like it (five or six times seems to work) before finishing the phrase with as before (from the note to be found at the 7th fret of the G string).
Following on from that you could play the phrase again but this time include (before the repeated phrase) the first two notes of the original sequence (the D string at the7th fret and the note to be found on the G string behind the 5th fret)
By being guided through the above process students will be hopefully be able to see that effective soloing is not a “Black Art” that only a chosen few can ever hope to master but rather a skill that can be developed from a familiarity with some relatively simple principles.